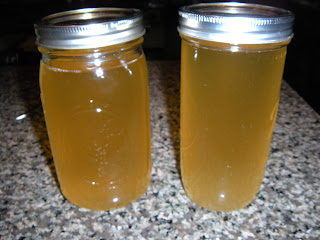
But on to the real reason for this post…lard! I don’t know about you, but for most of my life “lard” was a four letter word. As far as I knew it was something to be avoided at all costs. It was considered a dangerous saturated animal fat which we humans simply should not consume. Well, over the last few years I’ve come to learn that not all saturated and/or animal fats are bad for us. In fact, they are GOOD for us and our bodies need them. I am not going to go into the details regarding health benefits in this post, but you can read a good bit about it here: The Skinny on Fats. Rather, the purpose of this post is to show you how to make lard. It is so easy! I learned from Sheri Salatin when I came to the farm for my check-out last January. She basically just told me what to do and I went home and did it. This is by no means the only way to do this. I have only experimented and am sharing what worked for me.
First, and most importantly, you need to find a good source of pork fat because not all pork fat is created equally. You definitely want to use pasture-raised pork. If you can’t find it, forget it. Commercially raised pork is not worth it. Polyface sells pasture-raised pork fat for $1 a pound (cheap!!!). If you live nearby, come and get some! If not, you can do a Google search for farms in your area that raise pastured pork.
1.
Cut fat into cubes. The smaller the cube, the
easier/faster it melts. I've even heard of grinding the fat before rendering.
2.
Put cubes into crock-pot.
3. Turn crock-pot on. I turn mine on high to get it
started, but then turn it down to low. Stir occasionally. The
lard is done when the fat is rendered (melted) and separates from the
cracklings (the delicious bits that remain after the rendering). It has taken many hours each time I’ve
made it. If you want white, odorless (no
pork odor/taste) lard, then make sure to stop the process fairly soon after the
fat melts. If you keep cooking it, the resulting product will take on a
brownish color and will have a pork taste.
The latter variety is still very good, but if you want to bake with it,
you’ll probably want the “less-done” variety.
Unfortunately, I don't have a good pic of this step. I'll add a picture next time I make lard.
4.
Strain the lard.
I use a colander lined with cheese-cloth. You don’t have to use the
cheese-cloth, but if you don’t, crackling bits will mix in with the lard. Before I strain, I allow the lard to cool as
it is very hot and hard to manage. If
you can manage to pour the liquid from the crock into the strainer that is
fine, if not, you can scoop it into the strainer with a ladle.
5.
Pour into jars. I found about five pounds of
pork fat makes two quarts of lard. At
Polyface prices, that comes out to about $2.50 a quart. Not a bad deal!
Regarding the cracklings...cracklings are delicious bits of pure goodness. When they come out of the crock-pot, they will not be crispy. Although I have not done this, I have heard you can stick them in a frying pan to crisp them up. I hope to try this next time.
If you have never tried rendering lard, I hope this inspires you to give it a shot. You can use it for just about any of your cooking needs where fat is required. In addition to cooking with lard, I also hope to learn how to make soap with it this winter.
If you have never tried rendering lard, I hope this inspires you to give it a shot. You can use it for just about any of your cooking needs where fat is required. In addition to cooking with lard, I also hope to learn how to make soap with it this winter.
Does anybody out there already make lard? If so, I’d love for you to share any tips you
may have beyond what I have here. How about grass-fed beef tallow?
Has anybody experimented with that?
This post is part of Simple Lives Thursday and Pennywise Platter Thursday.
This post is part of Simple Lives Thursday and Pennywise Platter Thursday.


